How to Use a Shrinking Disc to Remove Dents and Waves
A shrinking disc is one of the most precise and effective tools for restoring stretched or wavy sheet metal. Mounted on a 7″ or 9″ variable-speed grinder or polisher, the stainless steel disc uses friction-based heat to gently shrink high spots and smooth distorted panels, without grinding or thinning the surface. Unlike torch shrinking or stud guns, the disc works only on the high areas, providing pinpoint accuracy and control. The result is a perfectly contoured surface that often requires little to no filler before paint.
When the disc spins against the metal, friction quickly warms the outer surface while the surrounding cooler metal contains that expansion. The moment you quench it with water or compressed air, the heated zone contracts, tightening the stretched area. This rapid heat-and-cool cycle is what restores “oil canned” or overworked panels to their original tension. It’s clean, repeatable, and highly controllable ideal for automotive restorations, coachbuilding, and precision panel repair.
At ProShaper Workshop, we’ve demonstrated this technique on everything from vintage Ferraris to hand-formed hot rod fenders. Our students quickly discover that mastering the shrinking disc not only removes distortion but teaches how metal truly moves. If you’re new to shaping, start with our full Metal Shaping Tools Guide then come back here to learn how to use the same method trusted by professional metal shapers worldwide.
What a Shrinking Disc Does
Understanding How to Use a Shrinking Disc to Remove Dents Effectively
Gently heats high spots through friction — only the highs, not the lows.
A shrinking disc generates controlled frictional heat on the raised areas of a panel. As it spins, the disc barely touches the metal, contact happens only at the high spots, never in the lows. That selective contact is what makes the tool so precise. The friction warms those peaks just enough for them to expand slightly while the surrounding metal stays cool, holding that expansion in place and creating compression within the panel. This process gives you the ability to remove waves, oil-canning, and distortion with incredible accuracy and without risking further stretch.
Cooling contracts the heated area and tightens stretched metal.
After a short pass, the heated zone is quenched, usually with a mist of water or a damp rag. As that area cools rapidly, the metal contracts and tightens the stretch. The cooler metal around the spot acts like a clamp, preventing expansion from spreading, and the result is a clean, measurable shrink exactly where you need it. It’s the same principle behind torch shrinking, but with far greater control and consistency. Instead of chasing random heat spread, the disc gives you a confined, predictable reaction every time.
Smooths panels without thinning, grinding, or introducing hammer marks.
Because a shrinking disc moves the metal rather than removes it, your panel retains its full thickness and strength. The surface ends up polished, not abraded. This makes it ideal for final finishing after planishing or welding, when you’re eliminating the last bit of distortion before primer. Used correctly, it leaves the panel smooth and tight, with no filler needed. For professional restorers and coachbuilders, that’s the real value of a shrinking disc, it restores true metal shape, not just surface appearance.
Tools and Materials Needed
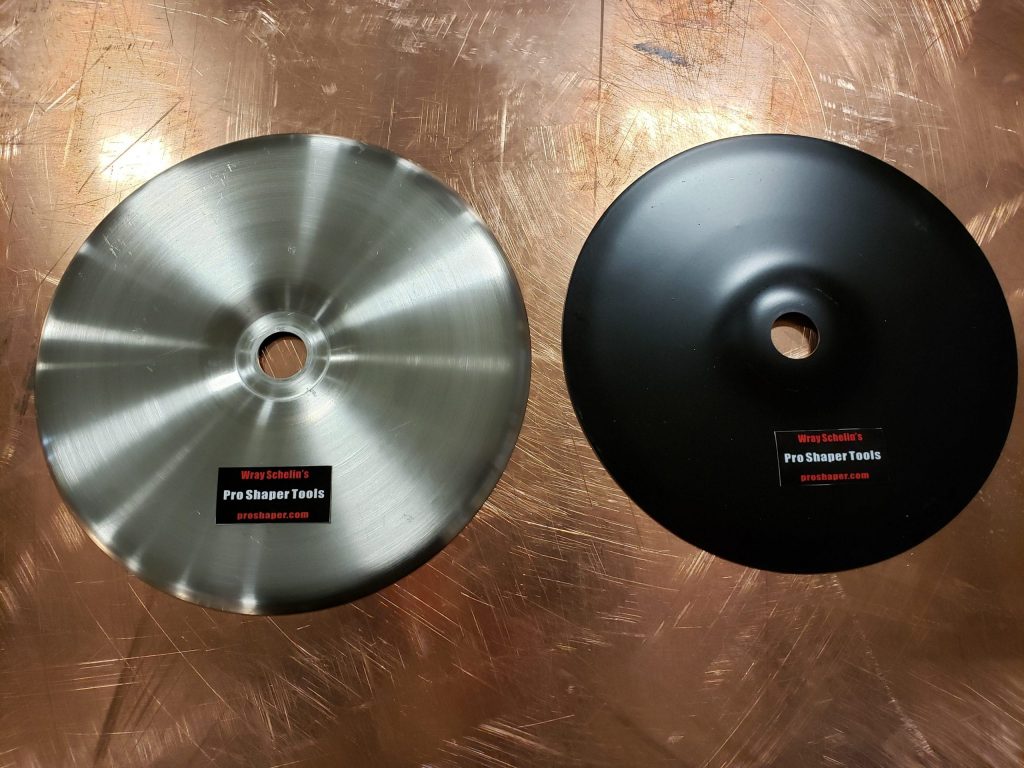
Stainless Shrinking Disc (for steel)
The stainless shrinking disc is the core of this method. Available in 5″ and 9″ diameters, it’s made from heavy-gauge stainless steel and built to handle continuous use on steel panels. The disc’s smooth face generates even friction and precise heat, tightening stretched or warped areas without damaging the surface. It’s ideal for large panels like doors, fenders, or hoods and provides the crisp, controlled shrink needed for professional-quality bodywork.
Phenolic Shrinking Disc (for aluminum and stainless)
The phenolic shrinking disc is specifically engineered for aluminum and stainless steel, which respond to heat much faster than mild steel. Phenolic material delivers a softer, more forgiving contact, preventing hot spots and reducing the risk of overheating thin panels. It’s perfect for mixed-metal projects, aluminum bodywork, or finishing stages where precision and temperature control are critical.
Backing Pad / Mounting Kit
A proper backing pad ensures the disc stays flat and stable during operation. It supports the disc evenly, absorbs vibration, and allows the grinder’s nut to sit slightly below flush so it never contacts the panel. Using a dedicated backing pad also extends the life of the disc and gives a smoother, more balanced feel in your hands, especially on wide panels where control matters most.
Variable-Speed Grinder or Polisher
Use a variable-speed right-angle grinder or polisher that accepts 5/8″-11 (or M14) threaded accessories. Variable speed is crucial; it lets you control the amount of friction heat produced and prevents accidental overheating. Ideal working range is roughly 1,000 – 3,000 RPM, depending on the metal type. Fixed-speed grinders often spin too fast and can distort panels before you realize it.
Spray Bottle or Quenching Method
After each heating pass, a quick quench with clean water or compressed air locks in the shrink. A simple spray bottle or damp rag works perfectly. The sizzle you hear on steel indicates proper surface temperature—hot enough to shrink, but not hot enough to discolor. On aluminum, quench immediately to prevent heat spread and retain control.
Safety Gear
Always wear gloves, eye protection, and hearing protection. Even at low speeds, discs spin fast and can shed heat quickly when quenched. Proper PPE keeps you comfortable and focused on technique instead of worrying about sparks or water mist. A light long-sleeve shirt and apron are also recommended during extended sessions.
Step-by-Step Process: How to Use a Shrinking Disc Like a Professional
Using a shrinking disc is about control, not force. The goal isn’t to grind or polish—it’s to move the metal just enough to reverse stretch and bring surface tension back into balance. Each pass should be deliberate and measured. Follow these steps to achieve consistent, professional results.
1. Map the Highs
Start by reading the panel. Sight along reflections, or use a straightedge, contour gauge, or reflection board to spot the high areas. Mark them clearly with a wax pencil or Sharpie. This first step is essential, your shrinking disc only affects what it touches, so you need to know exactly where those raised or stretched sections are. In professional auto bodywork and coachbuilding, this step separates a guess from precision metal shaping.
Pro tip: In good lighting, reflections will “swim” across a stretched or oil-canned panel. Those are your targets. Don’t rush this stage, diagnosis saves time later.
2. Set Speed & Stance
Attach your stainless or phenolic shrinking disc to a variable-speed grinder or polisher. The correct speed depends on the metal type and disc size. For steel panels, work between 1,500 and 3,000 RPM; for aluminum or stainless with a phenolic disc, stay closer to 1,000–2,200 RPM. This is one of the most searched questions—“what speed should I run a shrinking disc?” and this range is the safe, proven answer from decades of professional use.
Hold the grinder flat so the disc barely kisses the metal. Keep your feet steady and shoulders relaxed. You’re not pushing down, you’re simply guiding the tool across the surface. Let the disc’s friction generate the heat; too much pressure adds risk and kills control.
3. Make Light Passes
Turn the grinder on and make smooth, overlapping passes across the marked high areas. Use very light pressure, just enough for the disc to make full contact on the high spots. You’ll see a dull sheen appear on the metal as it warms. That sheen is your visual cue that you’ve reached the right surface temperature (around 250–350°F on steel, much lower than a torch would reach). There’s no need to blue the metal; a subtle dulling is ideal.
how do I know when a shrinking disc is working? The answer is simple: look for that even dulling and listen for the change in tone. When it hums smoothly instead of rattling, the surface is level and the heat is right.
4. Quench Immediately
Once you’ve completed a short pass, typically no more than 5 to 10 seconds on a localized area, immediately quench it. Use a fine mist from a spray bottle or wipe with a damp rag. The quick cooling makes the heated metal contract and tighten, creating the shrink. This is the step that transforms heat into movement. Without cooling, you’ve only expanded the area; the quench locks the metal back into place.
Common Google questions: “Can you use water with a shrinking disc?” and “Do you have to quench?” The answer to both is yes, controlled cooling is the foundation of the process. On steel, listen for the sizzle. On aluminum, cool immediately before the heat spreads.
5. Check and Repeat
After cooling, recheck the panel. Run your hand lightly across the surface and resight the reflections. If the wave or oil-canning has improved but not disappeared, mark any remaining highs and repeat the process in short, careful cycles. Each round builds cumulative improvement. Usually, a few cycles are all it takes to bring the surface back into true alignment.
Pro tip: As you refine the shape, your passes should become shorter and lighter. Let the panel tell you when it’s finished, when it feels tight, smooth, and “snaps” instead of flexing, you’ve restored its natural tension.
Bonus: Recognizing When You’re Done
How do I know when to stop with a shrinking disc? The answer: stop when the panel has equal resistance throughout. Tap it gently with your fingers; it should sound crisp, not hollow. Run a reflection light across it; there should be no slow, soft distortions. At that point, you’ve achieved a balanced, stable shrink and the panel is ready for primer or finish work.
Tips from the ProShaper Workshop
Keep it moving, hover, don’t lean.
The most common beginner mistake is pressing down too hard or lingering too long in one spot. A shrinking disc works by gliding across the metal, not grinding into it. Keep the tool flat and let the friction do the work. Move steadily over the high areas with smooth, overlapping passes. The goal is even surface heat, not deep color change or sparks. When the disc is working properly, it will hum smoothly and polish the highs without removing material. Excess pressure only risks dishing or creating a new low spot.
Watch the sheen, when it dulls, quench.
The visual cue is everything. As you pass over the panel, the surface will shift from bright to a soft, dull sheen, that’s when it’s ready to quench. Many shapers ask, “How hot should a shrinking disc get?” The answer is: just hot enough to dull the metal, not enough to blue or discolor it. On steel, you’ll see that light gray haze; on aluminum, you may only feel the warmth. The moment you reach that point, mist the area with water or wipe with a damp cloth to trigger the shrink. Overheating can cause a reverse effect, stretching or warping the surface rather than tightening it.
Aluminum needs finesse use the phenolic disc and shorter heat cycles.
Aluminum panels respond to heat almost instantly, so they require a gentler touch. Always use a phenolic shrinking disc instead of stainless, keep your RPMs lower, and limit contact to just a few seconds at a time. Because aluminum conducts heat quickly, even a small delay in cooling can let the temperature spread too far and undo your progress. Short heat cycles with immediate quenching give precise, localized shrinkage and a beautifully smooth finish. This method works especially well for hand-fabricated panels, aircraft aluminum, and delicate restoration work where metal thickness is minimal.
Sequence matters, planish first, then shrink.
Always planish before you shrink. Planishing, using a hammer and dolly or English wheel, aligns the metal’s grain structure and evens out the stretch from welding or previous work. Once that’s done, the shrinking disc fine-tunes the surface tension and removes the last waves or soft spots. This order of operations ensures you’re shrinking only what truly needs to move, not fighting against metal that’s still uneven underneath. Many experienced shapers repeat a pattern of planish → shrink → quench → read until the panel “locks in” and feels tight under hand pressure. It’s slow, methodical, and 100% effective.
Common Mistakes to Avoid
Staying in one spot too long
This is the most common cause of creating a low spot or “dish.” A shrinking disc is not meant to sit in one area and cook the metal. It’s designed to glide, heating the highs evenly through movement. Holding it still concentrates too much heat in one area, causing the metal to over-expand and then collapse as it cools, essentially the opposite of what you want. Keep the tool moving at all times, especially near edges or weld seams where metal is already thin or stressed.
Why did my shrinking disc create a low spot? The answer is almost always staying in one place or pressing too hard. Constant motion and patience prevent both problems.
Too much pressure, you’re polishing, not grinding
Pressing down on the grinder does not make the shrink faster, it makes it worse. A shrinking disc works through light friction, not pressure. Heavy pressure increases RPM drag and friction beyond control, generating excessive localized heat that can warp a panel. Think of the process as massaging the metal, not forcing it. Let the weight of the tool and its balance do the work. The goal is to build gentle, even warmth across the surface, not dig into it.
Skipping the quench step
Heat without cooling is just expansion. The shrink happens only during cooling. If you skip quenching, whether due to distraction or uncertainty, you’ll notice little to no improvement, and in some cases, even a softer, looser panel afterward. Always quench immediately after a pass. A light mist of water, a damp rag, or compressed air will lock in the shrink. On steel, the faint sizzle confirms you’re at the correct temperature range (roughly 250–350°F). On aluminum, quench immediately before heat spreads beyond the target area.
Running maximum RPM on thin aluminum
Many grinders run at fixed speeds of 6,000–8,000 RPM, which is too fast for shrinking discs—especially on thin sheet or aluminum. High RPM can instantly overheat the surface, leading to distortion or “puckering.” Always use a variable-speed grinder or polisher and stay within safe ranges: around 1,500–3,000 RPM for steel and 1,000–2,200 RPM for aluminum with a phenolic disc. Lower speeds provide better control, cooler operation, and smoother contact between disc and panel.
You’ll find countless online discussions around “what speed to use for a shrinking disc.” Those figures come directly from real-world testing in our shop, they’re proven safe and effective for consistent results.
Recommended Products
At ProShaper Workshop, every shrinking disc we sell is the exact design we use in our own restorations and classes. Each size and material serves a purpose — from large steel body panels to delicate aluminum projects. Whether you’re outfitting your first metal-shaping setup or upgrading professional equipment, these are the proven tools that deliver smooth, predictable results.
ProShaper Stainless Shrinking Discs (5″ and 9″)
Our stainless shrinking discs are made from heavy-gauge (.060″) stainless steel for stability, longevity, and perfectly smooth operation.
The 9″ disc is ideal for large panels — hoods, fenders, doors, and roof skins — where broad coverage and steady control make all the difference.
The 5″ disc is designed for tighter contours, smaller repair areas, or locations with limited access.
Both sizes generate the consistent surface heat needed to tighten stretched steel panels and eliminate waves without grinding or thinning the metal.
ProShaper Phenolic Shrinking Disc (Aluminum-Safe)
Our phenolic shrinking disc is specifically designed for aluminum and stainless steel. It provides a gentler, more forgiving heat transfer that prevents hot spots and distortion on softer metals. The lightweight construction makes it easy to handle for long sessions while maintaining the same precision and balance as our stainless version.
If you’re doing mixed-material work — such as classic aluminum body panels, stainless trim fabrication, or aircraft restoration — this disc is essential.
9″ Backing Pad / Mount Kit
A backing pad and mount kit completes the setup. It supports the disc evenly across its face, absorbs vibration, and ensures the grinder’s securing nut sits below flush so it never touches the panel. Proper mounting is critical for smooth, safe operation and for extending the life of both the tool and the disc.
We offer pads and adapters to fit common 5/8″-11 and M14 thread sizes used on most right-angle grinders and polishers worldwide.
Shrinking Disc Kits and Accessories
If you’re ready to equip your shop completely, our Shrinking Disc Kits include everything you need, discs, backing pads, and mounting hardware.
We stock 5″ and 9″ stainless discs, the 5″ phenolic disc for aluminum, plus matching pads and nuts for each size.
All components are precision-cut, balanced, and tested in our own workshop. When paired with a variable-speed grinder, these tools create the same flawless results demonstrated in our classes and videos.
Shop ProShaper Shrinking Discs & Kits to get the same professional-grade setup we rely on for every project, from vintage restorations to one-off coachbuilt panels.
Learn More
Level up your workshop with the complete system of tools: wheels, hammers, slappers, and more. Read our Metal Shaping Tools Guide or train with us in a 1-on-1 class.
Frequently Asked Questions
Will a shrinking disc thin my panel?
No. When used correctly, a shrinking disc does not remove metal. It only heats the high spots through friction, and the shrink occurs during the cooling phase as the metal contracts. The surface is polished, not ground, so the panel retains its original thickness and integrity.
Steel vs. aluminum — what disc should I use?
Use a stainless shrinking disc for steel panels. For aluminum or stainless steel, use a phenolic disc. The phenolic version runs cooler and provides a gentler, more forgiving heat cycle that helps prevent hot spots or distortion on softer metals.
What speed should I run a shrinking disc?
Use a variable-speed grinder or polisher and stay between 1,500–3,000 RPM for steel and 1,000–2,200 RPM for aluminum. High RPMs can cause overheating and panel distortion. Always start on the lower end of the range until you understand how your specific machine and disc respond to friction heat.
Do you need to quench with water?
Yes. The quench step is what locks in the shrink. After each short pass with the disc, mist the surface with water or wipe it with a damp rag to rapidly cool the heated area. Without cooling, you’ve only expanded the metal; cooling causes it to contract and tighten. On steel, listen for the quick “sizzle”—that’s the sound of a proper shrink.
Can I use a shrinking disc after welding?
Absolutely. A shrinking disc is one of the most effective tools for smoothing and tightening welded panels. After planishing the weld bead flat, use the disc in short, controlled passes to relieve stretch along the weld zone. This eliminates waves and tension, restoring proper surface contour before final finishing or primer.
[…] Want to learn how to use a shrinking disc like a pro? Read our full tutorial: How to Use a Shrinking Disc to Remove Dents and Waves. […]